


Operation: Atomic Export
How I exported emails from a protonmail email address.

Hello internet, it’s Matt from Forensics With Matt and in today’s blog post, I will write a quick one about how I exported emails from a ProtonMail account. You will learn why I needed to do this and which tools I used to accomplish this task.
The Situation
The situation I was faced with that required this action was something that I think that very few people will resonate with, but it’s still worth stating. It is as follows, I was contracted to create educational material for college students and I got very creative with this assignment. I created five virtual machines which were said to each belong to a character. Two of the five characters owned ProtonMail accounts and I wanted to have evidence on their machines and not have the students visit the accounts and tamper with evidence. This is how the thought process for getting this went.
The Beginnings
This revelation happened towards the end of the production of the project: I need a tamper-free evidence source for the characters in the local vm image. How do I get this? I searched for some information on this topic. I found a page directly from Proton that was giving a tutorial for their import/export tool for Windows, Mac and Linux. It was one of the first few results.
The Execution
When I saw the page I thought that I hit the jackpot. The page had a tutorial of everything I thought I needed to get the necessary information. I proceeded to download the import/export tool for Windows. The the download transferred a ZIP file to my computer which contained the two files that are shown in figure 1.

Figure 1: The import/export tool
Executing the tool yields a terminal window that first checks for an update and then asks the user to sign in. It then asks the user if he/she wants to recover or back up an account. Select the (B)ackup option. This will trigger a prompt that asks if you want to really go through with the operation, as in Figure 2. Select Yes.

Figure 2: Selecting location. (You may select a different path too!
A progress bar, as shown in Figure 3, will appear. When it fills up, the program will close and you will be able to see all of the emails in the folder you chose.

Figure 3: Downloads Progress Bar.
Once you navigate to the folder you decided to save the files to, you will see a folder that contains all of the emails inside. Within the container of emails, there are two files that make up an email, a .EML file and a .JSON file. The structure of the folder is shown in Figure 4. Next, I will discuss the structure of each file.

Figure 4: Contents of Email dump
In short, the .EML file is a fully formatted email file. This email is simply an encoded HTML file. It can be opened in your email viewer of choice. I have Thunderbird, which is why it says that it is a ThundrbirdEML file. The second file for each email is a JSON file containing metadata from the sender and receiver.
The names of these files are Base64URL encoded. Although they have this encoding, their contents seems to be a random identifier. This is unfortunately meaningless. Figure 5 shows the contents of one ,JSON file.
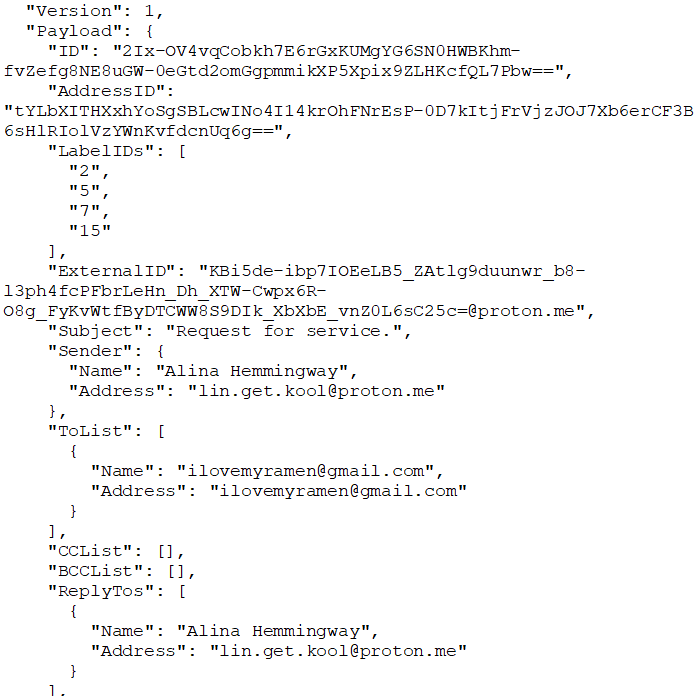
Figure 5a: First bit of metadata file.

Figure 4b: Final bit of metadata file.
This JSON metadata file doesn’t contain as much data as the message headers on regular email, but it does contain some of the more important information. As is evident, this file has data that is also URL encoded. It contains some important timestamps for when the email was sent, the parties who it was exchanged between, the size, and info related to the status and the contents of the email.
Conclusion
In conclusion, the process to recover unencrypted emails from a Proton Mail account is very simple. There is a tool already made by Proton, themselves, to download the email data from their servers. This data comes to your computer as a series of .EML files for the full emails and .JSON files for the metadata that goes along with those emails. The metadata shoen in the metadata files shows things like the senders/recievers, the time the mail was sent, the size of the message, the status (read/unread, reply, reply all, forwarded and/or attachments) and other qualifiers.
That being said, I hope that you guys enjoyed this blog post. If you’re new here, I really hope that you stick with me to learn more about forensics and technology in the future. If you are a long-time subscriber, I sincerely thank you for reading. Same if you’re somewhere in the middle.
As always, I hope you guys all learned something new today and hope you look forward to the next post. Thanks for reading this far, this has been Matt writing on ProtonMail forensics. Until next time, Matt OUT!