


Hidden in Plain Sight: My Implementation of LSB Steganography
A comprehensive review of my LSB steganography program.

Hello internet, it’s Matt and today I will be talking to you all about one of the projects I did during my Master’s program. This program will be my LSB steganography program that I built in my second semester during a digital image processing class. So without further adieu, let’s get into this program.
What is LSB Steganography?
The first question we need to answer before getting deep into the implementation of the program I wrote is the question of, “What is LSB steganography?” This is a question that is answered in two parts. I will break these two parts down now.
I: What is steganography?
ou may have heard of stenography before and think that that’s just another name for this, or you may think I just misspelled that word. I have to say that you are very wrong about that. Steganography is, in fact, a real thing.
the word ‘steganography’ is derived from the greek roots ‘Στεγανός’, meaning ‘hidden’, and ‘γραφήι’, meaning ‘to write’ or ‘written’. If we take these words and put them together, the word means something like ‘hidden writing’.
History gives us many examples of steganography before the invention of computers. The most popular example of steganography that you may know of is the use of invisible ink. Other interesting ways of hiding messages in the physical realm include encoding messages with some cipher (like Morse Code) and writing them somewhere on clothes or accessories that people wear. This method was done throughout history to safely get messages through enemy territory.
A second way of in-real-life steganography is making something like a musical cipher. In the construction of a musical cipher, a message is encoded into a song, a tune or a melody and then passed on to someone who can play it. The methods of encoding messages into music can get very compicated and be intertwined well with music theory. For instance, many ciphers based on different types of scales (like chromatic ciphers) can be used. I can spend an entire post discussing this subgenre of steganography, but I want to move on to other types of steganography.
There are also social types of steganography, which rely on one’s knowledge of an areas culture to decode messages. These types of steganography are used in areas where there are heavy restrictions (like gocvernment censorship) that force people to be creative when they write messages of an important nature. People may hide their true messages using things like pop culture references, specific patterns of capital letters, misspelling words in a message which are correctly spellled by checking pop culture ternds from a certain week, or even hiding pictures in messages.
When we move on to purely digital steganography, we have many other options. I, personally have seen steganogrqphy methods using images, audio files, and hiding things in network traffic. Images can be hidden within images, just like text, and there are some great open source tools to do that (like steghide and Hide-Image-In-Image. When it comes to hiding messages in audio, there are tools like Coagula that can do the job for you. Hiding things in network traffic is a lot harder. To do this, there has to be a great deal of requests going to a certain server.
Now, let me digress and pivot back to what you’re here for: LSB steganography.
II: What is LSB?
In computer science, the data that our computers produce, use, and share is all known as a series of smalll units of data called bits. A bit can be either a 1 or a 0; the circuit is either on or off. Going slightly higher, to where we will orient ourselves for the rest of the post, a byte is a series of eight bits.
A byte is read, often, from left to right, has two ends. The one that we start with at the front, the ‘0‘ bit, is the MSB (Most Significant Bit) and the eighth bit (bit ‘7’) at the end, is callled the Least Significant Bit.
This information is important for us as we move forward. Next I will describe how images work.
Image Fundamentals
When we look at images, we see a matrix of colors. A color has an array of three values from 0 to 255 if it’s on the RGB spectrum. These values cover the red, green and blue values that combine to make the color. An individual color, thus, looks like [130, 166, 202]. The RGB value of each element of the array (color channel) goes up or down depending on how close the color is to black [0, 0, 0] or white [255,255,255]. If we have a 3x3 matrix of pixels (picture elements) it may look like this:
([222, 108, 33], [133, 9, 65], [95, 222, 183])
([122, 83, 96], [123, 165, 88], [65,177, 208])
([189, 33, 198], [84. 103, 165], [66, 33, 108])
The RGB matrix of our image is read by the computer in binary. A single pixel can take a form similar to the following array [11011110,01101100,00100001]which allows us to more easily proceed with our study of how we hide data in images. Each channel’s values can be easily manipulated.
The Study that Inspired This
The study that inspired this program was summed up in a six-page paper that was written by four authors They implemented a process that sought to create a secure steganographic technique that hid the data efficiently. A secure technique is defined as one that does not leave obvious traces of the data being hidden in them. This can look like subtle distortions in color or obvious missing colors. The following image shows an example of an image that obviously had steganography performed on it.
Figure 1: An image with steganography.
Iou can see that there is a very obvious change in the pixels around halfway through the image. Inserting this into a hex editor shows us that someone attempted to hide some text in this image. It was hidden, but done so improperly.

Figure 2: Stego image in hex editor
The proper way to hide text in images securely is to manipulate the bits and make the message part of the bits instead of having the message be in plain text like this.
The researchers in the study sought to use LSB steganography, as well as XOR operations on RGB bits, to hide the data in the images. They also opted to not use keys to secure the images so their system would be simpler. Finally, they judged the secrecy of their program on the measurements provided by the Mean Squared Error (MSE) and the Peak Signal-to-Noise Ratio (PSNR).
The Process
The process that the study used, and that I adapted was two-fold, there was a process for extracting and one for embedding. Before we go further though, I would like to take some time to explain the process of LSB replacement.
The process of LSB replacement, by itself, is just a naĩve substitution of the final bit of the message into the final bit of a certain part of the image, for instance, if we have the following:
Image byte: 01011001
Message: 0010
Our output image bits would be 01011000.
A second process that the researchers outlined is 2-bit LSB replacement using DES. In this process, the same thing as above with single bit substitution happens, but with two bits instead. This is slightly more secure than the single bit substitution, but security can still be immptoved. 2-bit substitution involves replacing the last two bits instead of only the last bit.
The final process, and the one that was used in my program) is called steganography using LSB and Triple XOR Operation on MSB
The embedding process was as follows:
Data Embedding Procedure (Hiding the Message)
To hide data in the image, we first have to save the text we want to hide, somehow. We do this by creating some variable and passing it through to a function. This function will be one of two functions. In my implementation, there is a class that has an embed functiion and another embed function outside of the class. The embed function outside of the class is the one that does all of the work. The first step in the embed function that does the work is to convert the message to a binary sequence. This is so that we can do what I described above when I mantioned the bit substitution and XOR’ing business. Fancy!
Now, to actually embed data in the image, we take the message and split it up ny bits. The sequence of bits will be split in sections of three bits (for red, green, and blue channels) and we will do similar operations for each component channel. We will do the following with the bits
For each 3 bits of the message:
Take M1, XOR it with the 7th bit of Red (R7) of the image pixel → result replaces the 8th bit of Red (R8).
Take M2, XOR it with the 7th bit of Green (G7) → replace G8.
Take M3, XOR it with the 7th bit of Blue (B7) → replace B8.
We repeat this process repeat for each pixel until the message is fully embedded. This could be a few sections for a few bits in a small message or the entire image for a larger, novel-sized document!

Figure 3: The embedding function that does the math.
When we look at the embed function is in the class, we see that it’s just a control function for the ourte embed function. This function is what sets up the image that we are going to hide text in. It also makes a call to the outer function and embeds the message into the image. If it can’t, for some reason, embed a certain message into the image, it throes an error.

Figure 4: The caller function for the text embedding function.
Now that we took a look at the embedding function, we should take a look at the extraction function.
Data Etraction Procedure (Retrieving the Message)
In order to retrieve the message, we do a process similar to the opposite of the above process. This process involves breaking our image into its individual pixels and reading them one by one. We use the XOR operation in this process, once again, in order to undo what we did with the XOR operations above in the embedding. This process is summarized in quick bullets below.
For each pixel:
Check the 8th bit (LSB) and 7th bit of each color channel (R, G, B).
Use XOR:
If R7 ⊕ 1 == R8, the message bit is
1, else it's0.Repeat similarly for G7 vs G8 and B7 vs B8.
Once this process is done, the last part of the program can commence. This procedure will involve gathering all of the extracted bits from the image into some data structure (like a list or array) and read from that. The data that we read will be converted back into their unicode characters. This is precisely the magic that allows us to encode characters like ή, ้ร, 金, প, and བུན into images. This opens the door for people who speak just about every language to hide messages in their language with my app.
Here are the extract functions:

Figure 5: Outer extract function
My code simply opens the image, then converts it to bytes, then carries out the perscribed functions, then decodes the rexulting array of bytes.
The following is the class function to extract data:
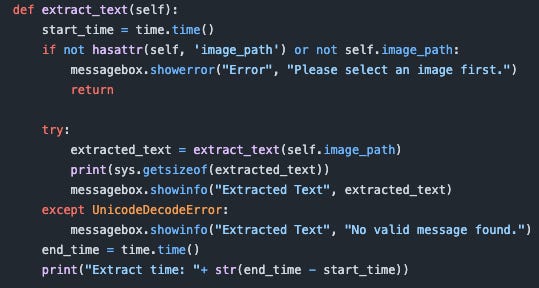
Figure 6: Inner extract function.
Next, we can finally do the most fun part, trying to hide some data in images!
Embedding and Extracting Data From Real Images
In this section, I will give a few examples of how this embedding and extracting works in practice. I want to pay sspecial attention to the quality of the image the program procuces. It must be ensured that the image suffers little to no loss in quality after the message is embedded. Before we begin with the images, I would like to share the UI of my program. This is the way it’s composed on a Mac.

Figure 7: Program UI
For the first image, I am using this image of thai food and embedding text in the Thai script as well as English into the image.

Figure 8: Thai food image.
This was the message I embedded within this image.
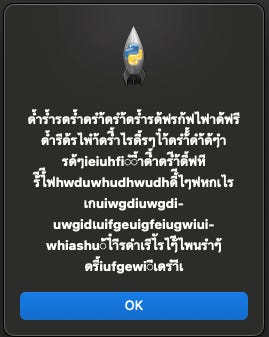
Figure 9: The message embedded into the image.
After hiding that message in the image I was met with an image that was extremely similar to the original. I genuinely did not think that either image was different. The colors look very similar and there is no distortion or odd noise that would give hints of there being something hidden in the image. Below I will add the image.

Figure 10: The image with hidden text.
There are a few other examples I have, but I don’t want there to be any problems with readers seeing the entire post, so I will end it here.
Conclusion
In conclusion, I had a fun time creating this steganography program. It is fully working and it hides text of any Unicode language perfectly in images. In basically all of the testing I have done, I have not seen very mush distortion or features in images that suggests that there is something wrong with the image. This tells me that this program is successful in its purpose of hiding text in images with very little traces of the text being there.
This has been Matthew from Forensics With Matt, talking about steganography. I appreciate you reading. If you liked this post, make sure to subscribe for more like it. Until next time, Matt OUT!