
Canonical Multipass Forensics 101
The forensics guide to Canonical Multipass (or how to find and analyze Multipass artifacts)

Hello everyone, Matt here coming to you with another post in the open-source sphere. This time, I’m going to be in the same vein as last week and discussing Multipass again. This time, I’ll go more into my forte, rather than the concepts and implementation of virtual machines at the high level. I’ll be doing a deeper investigation into how the Canonical Multipass app stores its virtual machines in Windows. Since Windows, Mac, and Linux have different file systems, we can have posts for two more weeks, once I digest the processes to get the files on those platforms.
In the meantime, we have enough information to make a post for a week on Windows systems. The way this happens is because of the Windows file system architecture. Multipass uses this architecture at its finest to split up the artifacts it generates to multiple different places. This post will share all of the places that it leaves artifacts.
If you are a forensic analyst or investigator, feel free to take this post and expand upon my findings and do more testing on this application. It can really help the community for if ever this app is found used in an investigation.
This post will be organized in the following way for easy reading: a brief catchup on Multipass, Multipass artifact location 1, Multipass artifact location 2, and Multipass artifact location 3. So, without further adieu, let’s get into this!
A Brief Refresher on Multipass
If you are finding this post for the first time, or have been reading and just so happened to have missed last week’s post, then you’d benefit from a brief introduction to Canonical Multipass. You wil get that now.
Many of my readers might have used virtual machines before. Such virtual machines were probably created by a hypervisor along the lines of VMWare, VirtualBox or even HyperV. If you’re on Mac, Uou might have used Parallels or UTM. No matter what you used, your virtual machines were created, used, and destroyed in a convenient and system-appropriate way. Basically, your system used native tools and knew what to do with the VM info.
Multipass does the same thing as these platforms I mentioned. On Windows, it has the options of familiar VM hypervisor drivers that are common on the platform. These hypervisor drivers are HyperV and VirtualBox. I’m sure my regular readers surely used both. I can say that, only as of recently (when VBox didn’t work for me) I began using HyperV by itself. HyperV is cool. It’s very different than VBox, but it’s a nice change.
Now that we know the hypervisors, we can talk about the details of how the program creates the virtual machines.
The first step to the operating of the Multipass app that I want to mention is the way it initializes the machine. The first thing it does is pulls down an image from the web. The image it downloads is the image of the Ubuntu that you pick. For instance, if I specify resolute (for 26.04: Resolute Raccoon) it’ll download the newest image of Ubuntu 26.04 full from the cloud. This may take a while based on your internet connection speed.
The second thing it does is sets up your new virtual machine up with a cloud-init config. This cloud-init config does all of the things you need it to do. It creates a basic user, provisions some basic resources from your machine, names your machine and starts it. This cloud-init config file generates a random name (ie incisive-spoonbill) along with a user named ubuntu.
The third thing it does is defines the environment. If the user who wants to create the machine wants a network connection and includes the --bridged option, the cloud-init file will contain some line defining the network with the desired default bridged network interface. There are all sorts of settings that we can define with settings. We could get into that later on.
Thank you for reading this post. If you like the post, please consider becoming a paid subscriber so that you can help me justify writing this blog every week. It will also help me to afford to bring you better content and more interesting forensic investigations.
Location 1: ProgramData
Within the top-level directory of ProgramData folder has the most places where Multipass stores its data. It has two folders at its root (C:\ProgramData\Multipass): the cache folder and the data folder. The cache folder holds cached data, such as the images that Multipass uses to compose the virtual machines that you tell it to make. If you decide to go into the data folder, you’ll have the actual virtual machine files that you are working with. This section will tell what’s in each folder.
cache Folder
As I just mentioned, the cache folder is a cache of all of the images you pulled from the web. This is very important because you might not always want to download the image as a new download each time you build a machine. Say you make a Jammy Jellyfish (Ubuntu 22.04) machine and a Noble Numbat machine (Ubuntu 24.04) machine. today and want to make a new machine of each next Tuesday, it’s extremely helpful to keep the original virtual machine images and expand or contract them based on the resources allocated.
If you traverse the folder, the cache will contain the images for each hypervisor. It will create a folder for VBox named virtualbox and one for HyperV named vault. Within the virtualbox folder, Multipass will create a folder named vault. This vault folder will contain all of the images. It will also contain a JSON file named multipassd-image-records.json. This file shows the metadata for the images that this folder holds in a JSON format like the one shown below.
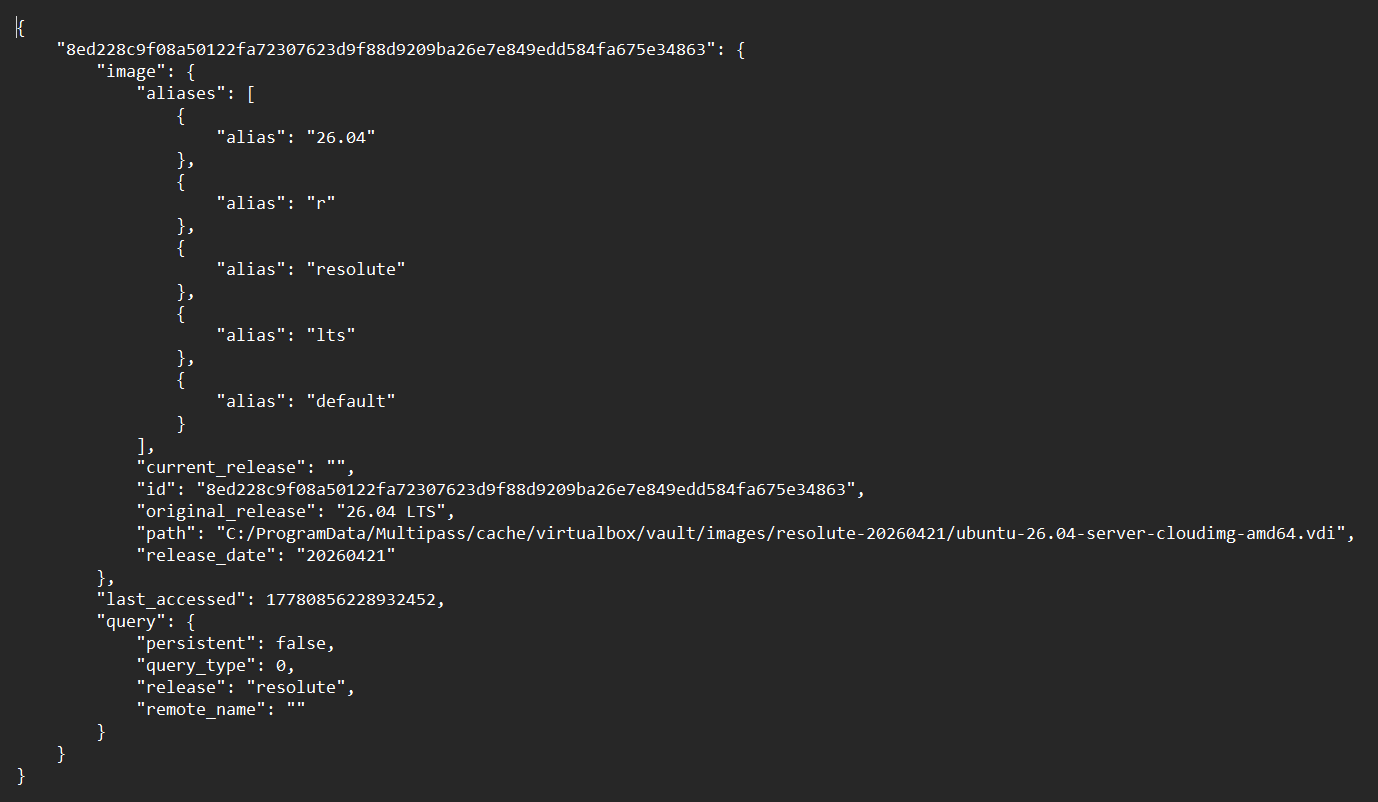
As you can see, the format of the image you get is a VDI image. This is an image in VBox format. This image is in a simple format that we can observe when we look into it. All that it is is a compressed archive that holds the system, kernel and boot partitions for the machine to run. Extracting the data from this image reveals the following image files:
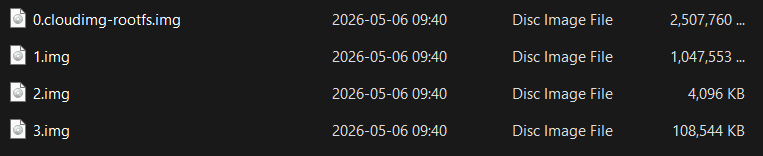
Extracting the 0-cloudimg-rootfs.img file exposes the contents of the root filesystem, as the name implies. By extracting this image, you can see the base state of the machine. A similar thing goes with the higher numbered images; extracting 1.img will reveal the kernels and the information in the boot partition.
To avoid a great deal of repetition, I’ll say that a similar thing happens if you travel down the tree that is the vault folder. You can see a similar multipassd-image-records.json file as well as folder with an image inside it. This image is slightly different in format, though, being a .vhdx image for HyperV. It has a similar structure to the VBox one too.
When we go back up to the root of the cache folder, there are still two more folders to traverse. There is one called network-cache and another called multipass-blueprints.zip. The network-cache folder contains data about the transactions that the network made, while the multipass-blueprints folder (when extracted) contains a group of YAML configurations for various appliances that can be created with these images. Below is an example of what can be found in a blueprint. This blueprint is called docker.yaml:
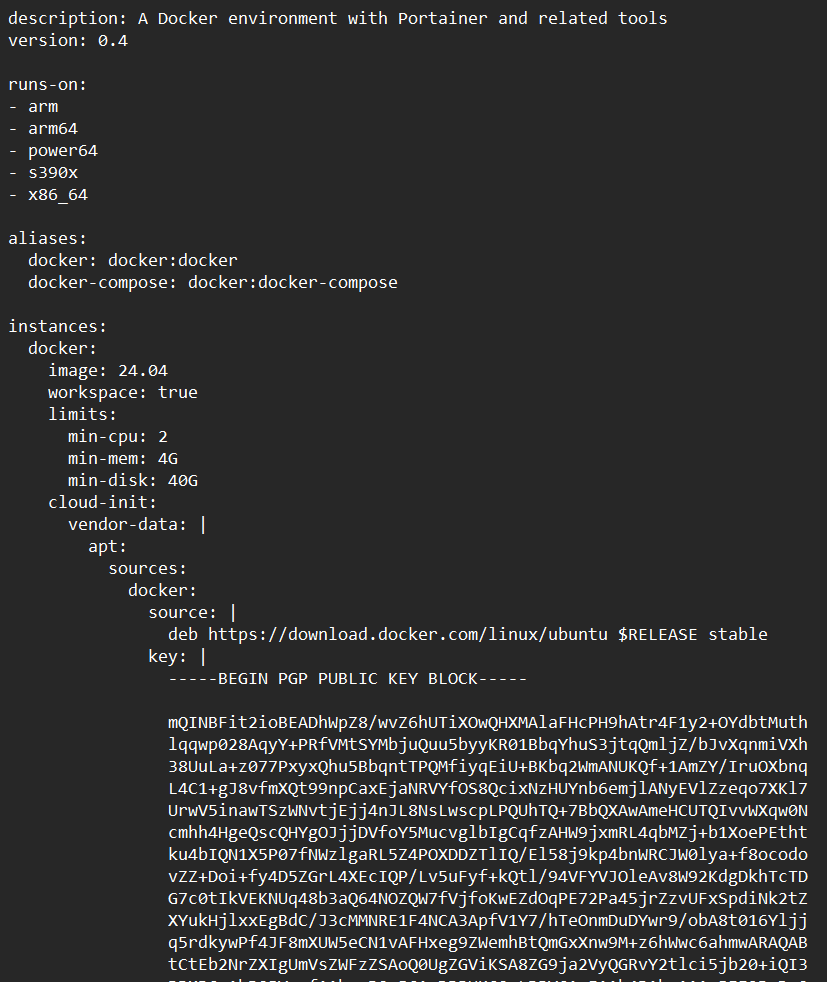

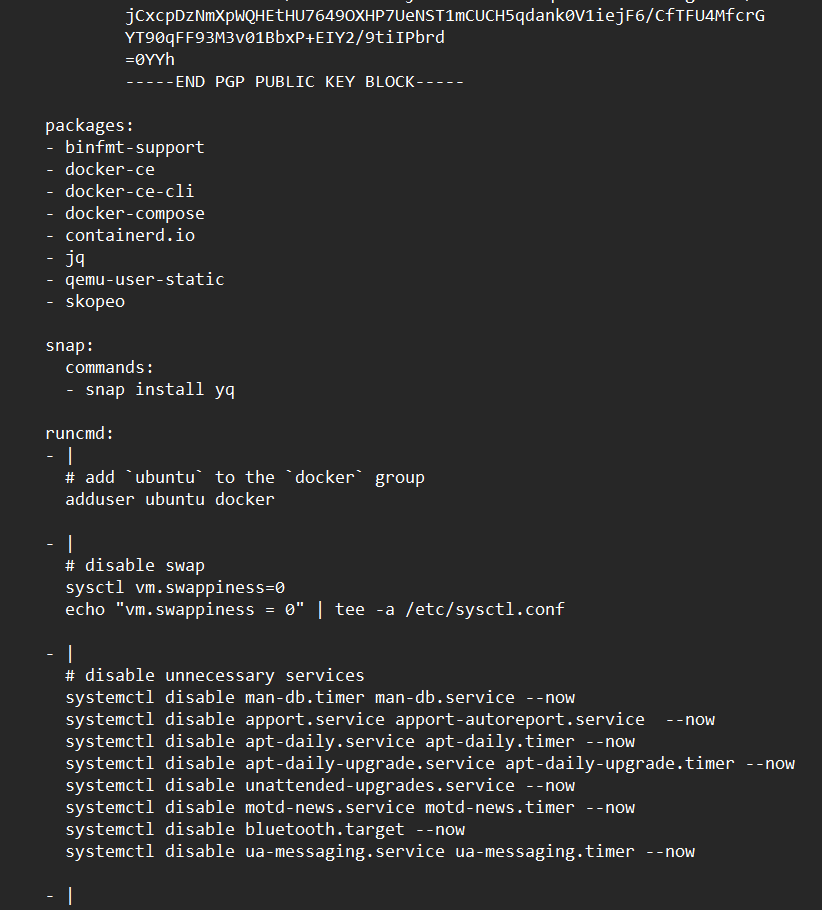
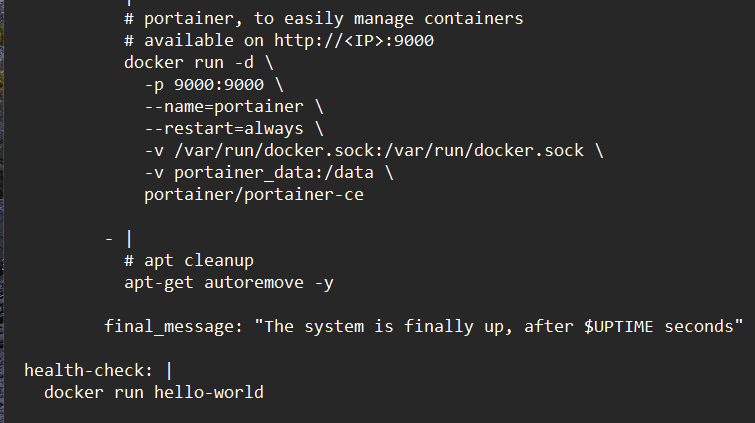
You can see that this YAML file defines a whole Docker setup. It is complete with naming conventions, resource limits, required architectures, required services and packages, docker behaviors and other system behaviors.
With all of that out of the way, let’s take a look at the other folder: the vault next.
data folder
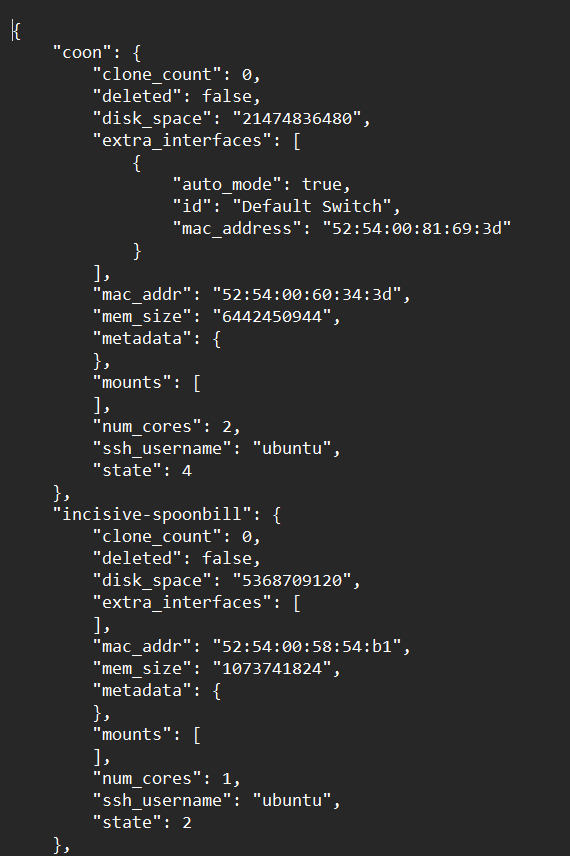
The data folder is laid out similarly to the above-mentioned cache folder. It has similar vault and virtualbox folders which hold the created virtual machines along with files and folders that hold various SSH keys and certificates that allow you to access your machines. It also contains a file called multipassd-vm-instances.json that just contains the names and properties of each instance. You can see an example of the file’s contents below:
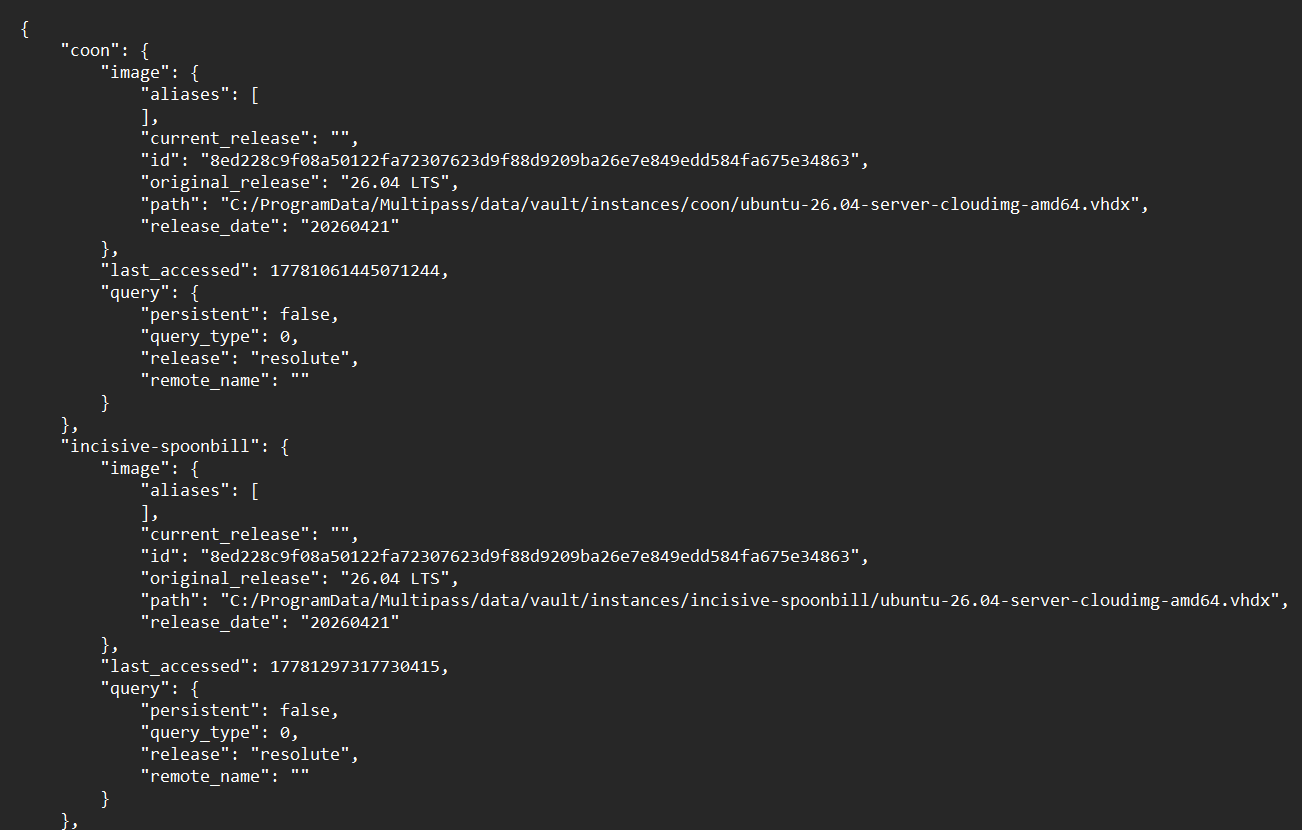
If you traverse down the path made by the vault folder, you will see two items: an instances folder and a file named multipassd-instance-image-records.json. This file contains information like the date that the machine was last accessed, the name, and other relevant information. An example of this file is shown below.
The instances folder contains the images for each instance, as the name implies. One can navigate into the folder containing the instance and find two images. There is one VHDX file and an ISO file with the configuration that initiated the machine. the latter file is called cloud-init-config.iso. The VHDX file is called ubuntu-<version>-server-cloudimg-amd64.vhdx. Each of these files can be decompressed to reveal their contents. The cloud-init-config file will reveal the following config files that are sections of a cloud-init.yaml file:

When Multipass is configured to use VirtualBox as its backend, the virtualbox folder under C:\ProgramData\Multipass\data becomes the primary storage location for artifacts associated with those instances. Unlike the vault directory, which uses Hyper‑V–specific formats, this folder follows conventions more closely aligned with native VirtualBox virtual machine layouts and therefore exposes a different, but equally rich, set of forensic artifacts.
At the top level of the virtualbox folder, one can observe subdirectories corresponding to individual Multipass instances. These directories are named using identifiers generated by Multipass and serve as containers for the configuration and disk assets required by VirtualBox to define and run the virtual machine. The presence of these instance‑specific folders provides direct evidence that VirtualBox was the active driver at the time the instance was created. The following is an example of what the folder for an instance could look like when you traverse through it:
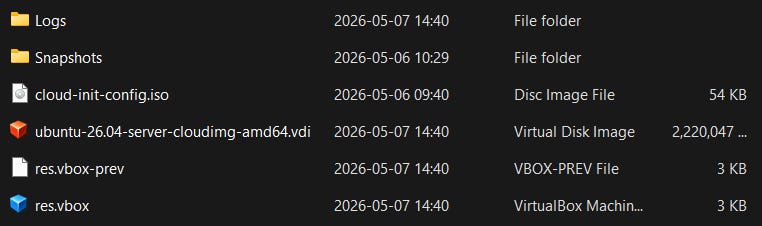
Within each instance directory, investigators will typically encounter a VirtualBox configuration file (commonly with a .vbox extension). This file is an XML document that defines the virtual machine’s hardware configuration, including allocated memory, CPU count, storage controllers, and attached virtual disks. From a forensic standpoint, this file is particularly valuable because it captures how the instance was configured at launch and may also contain references to snapshot chains or attached media that are no longer present but were once used by the system.
Accompanying the configuration file are one or more virtual disk images, most commonly stored in the Virtual Disk Image (VDI) format. These VDI files represent the persistent storage of the Multipass instance and contain the guest operating system’s full file system. As with the VHDX images found under the vault directory, these disk images can be mounted or converted using forensic tools to enable examination of files, logs, packages, user data, and timestamps from within the virtual machine. The existence and modification times of these files can also assist in establishing when the instance was created, used, or last modified.
In some cases, additional subfolders may be present within an instance directory to store snapshots or auxiliary VirtualBox state information. These artifacts may indicate that the virtual machine was suspended, resumed, or snapshotted during its lifetime. Snapshot files are particularly important from a forensic perspective, as they may preserve historical states of the virtual disk that differ from the current active image.
Collectively, the files and subfolders within the virtualbox directory provide a detailed record of Multipass instances that were backed by VirtualBox. By correlating these artifacts with the JSON metadata files described earlier (such as multipassd-vm-instances.json), an examiner can confidently attribute specific disk images and configurations to named Multipass instances and reconstruct both their configuration and usage history. This distinction is critical when analyzing a system that may show evidence of multiple virtualization backends having been used over time.
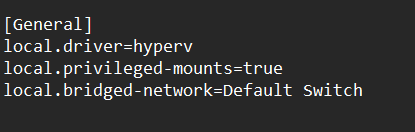
The final item to discuss in the Multipass folder in the ProgramData folder is the multipassd.conf file. This file defines the high level properties of the machine. It has lines for the hypervisor type, the ability to make mounts (if available) and the networking type. Below is an example of how it could look based on my configuration.
Now that I have completely explained the ProgramData’s Multipass folder, let’s talk about the other ones: the one in Program Files and the one in Users\<username>\AppData\Multipass.
Location 2: Program FIles\Multipass Folder Contents
The C:\Program Files\Multipass folder exclusively contains all of the executables that are related to Multipass. The multipass.exe file and the multipassd.exe service executable live within the bin folder at the root of this folder. There’s not really much to say after that, except that the folder also contains the assets that the program uses for its user interface components.
Now we can move onto the user-specific folders in AppData\Local\Multipass.
Location 3: User Specific Folder (AppData\Local\Multipass)
FInally, we can talk about the last place that data can be found relating to the Multipass app: the C:\Users\<username>\AppData\Local\Multipass folder. This folder is known to exist and I can verify that it exists on my installation, however, it wasn’t used. It’s there but is empty. Things might be stored there, but they would be there transiently.
Multipass utilizes a daemon, or system-level service, to operate. Since daemons are system-level and not necessarily user-level, the user-facing directories won’t really be touched. It’s existence is a strange phenomenon in the case that we are in with multipassd being a daemon and nothing user-facing.
Conclusion
The experimentation I did with Multipass was a a fun experience. It was really nice to get to use virtual machines again and experience another solution to create and manage them. The production of this blog post was slightly frustrating because Canonical was hacked at the time that I wanted to begin writing this for Windows. This meant that I had trouble initializing machines at some point since the initialization process involves contacting Canonical servers. Or so I thought. It turned out that my Windows computer’s firewall was blocking Multipass from contacting the internet (which is something that I wouldn’t have expected.) Everything was fine after resolving that problem and I was able to conduct experimentation just fine after that.
Overall, I found this application fascinating. It is a nice way to stand up virtual machines without the hassle of downloading huge image files and doing full interactive installs. I imagine someone with a fast internet connection and a blazing fast computer can get a VM in very short order with this app and I’m al for having infrastructure be set up that conveniently!
If you read this far, you’ll definitely have paid. I’m grateful for your donation to my research, this should help me to get some bigger projects going in a short amount of time. There will be more paywalled posts like this in the future, that is just a measure on content that I think is worth the paywall to make it worth doing.
With that, I hope you enjoyed the post and learned something new. Until next time, Matt OUT!